Oracle Live SQL
In this article, you are going to learn how to use Oracle Live SQL and how to work with Oracle Database without installing the database. Get instant access to the Oracle Database and learn from a collection of community scripts and tutorials. Write your own SQL scripts and easily share them with others. All you need to get started is your Oracle.com account.
Following steps helps you to build your knowledge in SQL.
Step 1: Start with a basic structure as given in the following below diagram.

Step 2: Learn some basic terminologies i.e. Field, Row, And Column (s). So, it helps you to better understanding.
Step 3: Break it into some simple steps, i.e. Create a Table, Make some conditions on attributes (integrity constraints), Inserting values, and Make sure all values are inputted in their proper place.
Step 4: There are some queries and you should answer those.
Step 5: Commit; After Creating and inserting values because sometimes data is not saved automatically. Commit is used for saving purposes.

PRACTICE SQL IN LIVESQL
Creating Tables:
Tables are the basic unit of data storage in an Oracle Database. Data is stored in rows and columns. You define a table with a table name, such as employees, and a set of columns. You give each column a column name, such as employee_id, last_name, and job_id; after that a datatype, such as VARCHAR2, DATE, or NUMBER; after that mention a width. The width can be predetermined by the datatype, as in DATE. If columns are of the NUMBER datatype, define precision and scale instead of width. A row is a collection of column information corresponding to a single record.
You can specify rules for each column of a table. These rules are called integrity constraints. One example is a NOT NULL (integrity constraint). This constraint forces the column to contain a value in every row, NOT NULL is not a value.
For example:
create table DEPARTMENTS (
  deptno        number,
  name          varchar2(50) not null,
  location      varchar2(50),
  constraint pk_departments primary key (deptno)
);
DeptNO generated using Trigger, Tables can declaratively specify relationships between tables, typically referred to as referential integrity(Parent-Child relation). To see how this works we can create a "child" table of the DEPARTMENTS table by including a foreign key in the EMPLOYEES table that references the DEPARTMENTS table.
For example:
create table EMPLOYEES (
  empno             number,
  name              varchar2(50) not null,
  job               varchar2(50),
  manager           number,
  hiredate          date,
  salary            number(7,2),
  commission        number(7,2),
  deptno           number,
  constraint pk_employees primary key (empno),
  constraint fk_employees_deptno foreign key (deptno)
      references DEPARTMENTS (deptno)
);
Foreign keys must reference primary keys, so to create a "child" table the "parent" table must have a primary key for the foreign key to reference. It also helps to reduce problem-solving complexity.
Creating Triggers:
Triggers are procedures that are stored in the database and are implicitly run, or fired, when something happens. Traditionally, triggers supported the execution of a procedural code, in Oracle procedural SQL is called a PL/SQL block. PL stands for procedural language. When an INSERT, UPDATE, or DELETE occurred on a table or view. Triggers support system and other data events on DATABASE and SCHEMA.
Triggers are frequently used to automatically populate table primary keys, the trigger examples below show an example trigger to do just this. We will use a built-in function to obtain a globally unique identifier or GUID.
create or replace trigger  DEPARTMENTS_BIU
    before insert or update on DEPARTMENTS
    for each row
begin
    if inserting and :new.deptno is null then
        :new.deptno := to_number(sys_guid(),
          'XXXXXXXXXXXXXXXXXXXXXXXXXXXXXXXX');
    end if;
end;
/

create or replace trigger EMPLOYEES_BIU
    before insert or update on EMPLOYEES
    for each row
begin
    if inserting and :new.empno is null then
        :new.empno := to_number(sys_guid(),
            'XXXXXXXXXXXXXXXXXXXXXXXXXXXXXXXX');
    end if;
end;
/
Inserting Data:
We created tables properly, and we have triggers to automatically populate our primary keys, we can add data to our tables. Because we have a parent-child relationship, with the DEPARTMENTS table as the parent table, and the EMPLOYEES table as the child we will first INSERT a row into the DEPARTMENTS table. So, the Insertion of data values can easily be done.
insert into departments (name, location) values
   ('Finance','New York');

insert into departments (name, location) values
   ('Development','San Jose');
Let's verify that the insert was successful by running a SQL SELECT statement to query all columns and all rows of our table.
select * from departments;| DEPTNO | NAME | LOCATION |
|---|---|---|
| 241871540121193736077918737151514289109 | Finance | New York |
| 241871540121196153929557966409863701461 | Development | San Jose |
You can see that an ID will have been automatically generated. You can now insert into the EMPLOYEES table a new row but you will need to put the generated DEPTNO value into your SQL INSERT statement. So, joining related queries can be performed. The examples below show how we can do this using a SQL query, but you could simply enter the department number directly.
insert into EMPLOYEES
   (name, job, salary, deptno)
   values
   ('Sam Smith','Programmer',
    5000,
  (select deptno
  from departments
  where name = 'Development'));

insert into EMPLOYEES
   (name, job, salary, deptno)
   values
   ('Mara Martin','Analyst',
   6000,
   (select deptno
   from departments
   where name = 'Finance'));

insert into EMPLOYEES
   (name, job, salary, deptno)
   values
   ('Yun Yates','Analyst',
   5500,
   (select deptno
   from departments
   where name = 'Development'));

select * from Employees;| EMPNO | NAME | JOB | MANAGER | HIREDATE | SALARY | COMMISSION | DEPTNO |
|---|---|---|---|---|---|---|---|
| 241871133287053808049605250860362424530 | Sam Smith | Programmer | - | - | 5000 | - | 241871540121196153929557966409863701461 |
| 241871133287056225901244480118711836882 | Mara Martin | Analyst | - | - | 6000 | - | 241871540121193736077918737151514289109 |
| 241871133287058643752883709377061249234 | Yun Yates | Analyst | - | - | 5500 | - | 241871540121196153929557966409863701461 |
Indexing Columns :
Typically developers index columns for three major reasons:
- To enforce unique values within a column
- To improve data access performance
- To prevent lock escalation when updating rows of tables that use declarative referential integrity
When a table is created and a PRIMARY KEY is specified an index is automatically created to enforce the primary key constraint. If you specific UNIQUE for a column when creating a column a unique index is also created. To see the indexes that already exist for a given table you can run the following dictionary query.
select table_name "Table",
       index_name "Index",
       column_name "Column",
       column_position "Position"
from  user_ind_columns
where table_name = 'EMPLOYEES' or
      table_name = 'DEPARTMENTS'
order by table_name, column_name, column_position;| Table | Index | Column | Position |
|---|---|---|---|
| DEPARTMENTS | PK_DEPARTMENTS | DEPTNO | 1 |
| EMPLOYEES | PK_EMPLOYEES | EMPNO | 1 |
It is typically good form to index foreign keys, foreign keys are columns in a table that reference another table. So, You can use some join operations. In our EMPLOYEES and DEPARTMENTS table example, the DEPTNO column in the EMPLOYEE table references the primary key of the DEPARTMENTS table.
create index employee_dept_no_fk_idx
on employees (deptno);
We may also determine that the EMPLOYEE table will be frequently searched by the NAME column. To improve the performance searches and to ensure uniqueness we can create a unique index on the EMPLOYEE table NAME column.
create unique index employee_ename_idx
on employees (name);
Oracle provides many other indexing technologies including function based indexes which can index expressions, such as an upper function, text indexes which can index free form text, bitmapped indexes useful in data warehousing. You can also create indexed organized tables, you can use partition indexes and more. Sometimes it is best to have fewer indexes and take advantage of in memory capabilities. All of these topics are beyond the scope of this basic introduction.
Querying Data :
To select data from a single table it is reasonably easy, simply use the SELECT … FROM … WHERE … ORDER BY … syntax.
select * from employees;| EMPNO | NAME | JOB | MANAGER | HIREDATE | SALARY | COMMISSION | DEPTNO |
|---|---|---|---|---|---|---|---|
| 241871133287053808049605250860362424530 | Sam Smith | Programmer | - | - | 5000 | - | 241871540121196153929557966409863701461 |
| 241871133287056225901244480118711836882 | Mara Martin | Analyst | - | - | 6000 | - | 241871540121193736077918737151514289109 |
| 241871133287058643752883709377061249234 | Yun Yates | Analyst | - | - | 5500 | - | 241871540121196153929557966409863701461 |
To query data from two related tables you can join the data
select e.name employee,
           d.name department,
           e.job,
           d.location
from departments d, employees e
where d.deptno = e.deptno(+)
order by e.name;| EMPLOYEE | DEPARTMENT | JOB | LOCATION |
|---|---|---|---|
| Mara Martin | Finance | Analyst | New York |
| Sam Smith | Development | Programmer | San Jose |
| Yun Yates | Development | Analyst | San Jose |
As an alternative to a join you can use an inline select to query data.
select e.name employee,
          (select name
           from departments d
           where d.deptno = e.deptno) department,
           e.job
from employees e
order by e.name;| EMPLOYEE | DEPARTMENT | JOB |
|---|---|---|
| Mara Martin | Finance | Analyst |
| Sam Smith | Development | Programmer |
| Yun Yates | Development | Analyst |
Adding Columns :
You can add additional columns after you have created your table using the ALTER TABLE … ADD … syntax. For example:
alter table EMPLOYEES
add country_code varchar2(2);
Querying the Oracle Data Dictionary:
Table metadata is accessible from the Oracle data dictionary. The following queries show how you can query the data dictionary tables. In LIVE SQL, desc table_name is not working, in those cases, we can consider the following query.
select table_name, tablespace_name, status
from user_tables
where table_Name = 'EMPLOYEES';

select column_id, column_name , data_type
from user_tab_columns
where table_Name = 'EMPLOYEES'
order by column_id;| STATUS | ||
|---|---|---|
| EMPLOYEES | LIVESQL_USERS | VALID |
| COLUMN_ID | COLUMN_NAME | DATA_TYPE |
|---|---|---|
| 1 | EMPNO | NUMBER |
| 2 | NAME | VARCHAR2 |
| 3 | JOB | VARCHAR2 |
| 4 | MANAGER | NUMBER |
| 5 | HIREDATE | DATE |
| 6 | SALARY | NUMBER |
| 7 | COMMISSION | NUMBER |
| 8 | DEPTNO | NUMBER |
| 9 | COUNTRY_CODE | VARCHAR2 |
Updating Data :
You can use SQL to update values in your table, to do this we will use the update clause
update employees
set country_code = 'US';
The query above will update all rows of the employee table and set the value of country code to US. You can also selectively update just a specific row.
update employees
set commission = 2000
where  name = 'Sam Smith';
Lets run a Query to see what our data looks like
select name, country_code, salary, commission
from employees
order by name;| NAME | COUNTRY_CODE | SALARY | COMMISSION |
|---|---|---|---|
| Mara Martin | US | 6000 | - |
| Sam Smith | US | 5000 | 2000 |
| Yun Yates | US | 5500 | - |
Aggregate Queries :
Except for COUNT(*) , aggregate functions ignore null values. and COUNT never returns null, but returns either a number or zero.
You can sum numeric data in tables using aggregate functions.
We will use column aliases to rename columns for readability.
We will also use the null value function (NVL) to allow us to properly sum columns with null values. Such that, Return date in a Library Management System is Null until it was returned.
Suppose, Primary key present in an attribute then null values are restricted because the Primary key does not contain any null values.
select
      count(*) employee_count,
      sum(salary) total_salary,
      sum(commission) total_commission,
      min(salary + nvl(commission,0)) min_compensation,
      max(salary + nvl(commission,0)) max_compensation
from employees;| EMPLOYEE_COUNT | TOTAL_SALARY | TOTAL_COMMISSION | MIN_COMPENSATION | MAX_COMPENSATION |
|---|---|---|---|---|
| 3 | 16500 | 2000 | 5500 | 7000 |
Compressing Data :
As your database grows in size to gigabytes or terabytes and beyond, consider using table compression. So, Table compression saves disk space and reduces memory use in the buffer cache. Table compression can also speed up query execution during reads. There is, however, a cost in CPU overhead for data loading and DML. Table compression is completely transparent to applications. It is especially useful in online analytical processing (OLAP) systems, where there are lengthy read-only operations, but can also be used in online transaction processing (OLTP) systems.
You specify table compression with the COMPRESS clause of the CREATE TABLE statement. You can enable compression for an existing table by using this clause in an ALTER TABLE statement. In this case, the only data that is compressed is the data inserted or updated after compression is enabled. Similarly, you can disable table compression for an existing compressed table with the ALTER TABLE...NOCOMPRESS statement. In this case, all data the was already compressed remains compressed, and new data is inserted uncompressed.
To enable compression for future data use the following syntax.
alter table EMPLOYEES compress for oltp;
alter table DEPARTMENTS compress for oltp;
Deleting Data :
You can delete one or more rows from a table using the DELETE syntax. In those cases where a wrong value is inserted or want to remove some rows from the table. For example to delete a specific row:
delete from employees
where name = 'Sam Smith';
Dropping Tables :
You can drop tables using the SQL DROP command. Thus, Dropping a table will remove all of the rows and drop sub-objects including indexes and triggers. The following DROP statements will drop the departments' and employees' tables. The optional cascade constraints clause will drop remove constraints thus allowing you to drop database tables in any order.
drop table departments cascade constraints;
drop table employees cascade constraints;
Un-dropping Tables :
If the RECYCLEBIN initialization parameter is set to ON (the default in 10g), then dropping this table will place it in the recycle bin. To see if you can undrop a table run the following data dictionary query:
select object_name,
       original_name,
       type,
       can_undrop,
       can_purge
from recyclebin;
To undrop tables we use the flashback command, for example:
flashback table DEPARTMENTS to before drop;
flashback table EMPLOYEES to before drop;
select count(*) departments
from departments;
select count(*) employees
from employees;| DEPARTMENTS |
|---|
| 2 |
| EMPLOYEES |
|---|
| 2 |
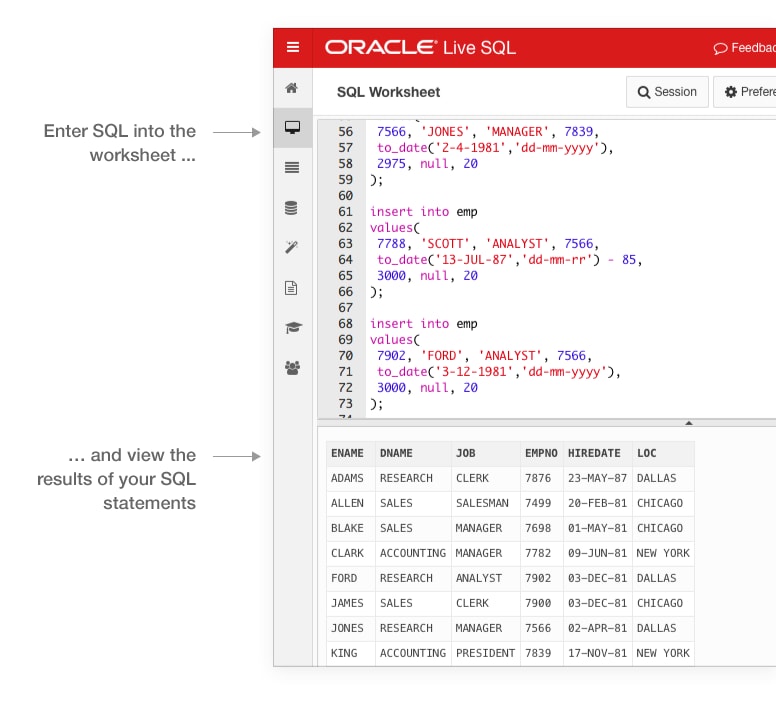
In the above figure, An instance is shown. So that, Understanding is clearer to you.
YOU MIGHT LIKE:
FAQ:
1> How to describe my table in Live SQL?
This syntax helps you to fetch your table details before inserting any value, i.e.
select column_id, column_name , data_type from user_tab_columns where table_Name = 'TABLE_NAME'order by column_id;
Comments
Post a Comment